North Lake to South Lake Final Day: Over Bishop Pass

Day 6: Dusy Basin over Bishop Pass to South Lake Trailhead
Mileage: ~9 miles
Elevation Gain/Loss: ~1,000 feet/~2,000 feet
Campsite: Hotel in the town of Bishop
Highlight: View from the top of Bishop Pass (and trail angels)
Watch out for: Poor little drowned mice

Day 5 Campsite

Day 5 Campsite (Featuring Lorraine’s Tent)

The last morning of our trip we all woke to icy tent walls and sleeping bags covered in frozen condensation. Luckily, there was not a single cloud in the sky, so we laid everything out to melt in the sun and took it slow to give our stuff a chance to dry. Anna went fishing at dawn, I boiled water and relaxed over a cup of Starbucks instant coffee (while patching up some blisters on my toes), and Lorraine took her morning dip in the stream. Only 2 things went wrong with our relaxing morning: 1) the fish refused to bite for Anna and 2) we discovered 2 drowned mice in our collapsible water bucket.

Dusy Basin

Dusy Basin under a Blue Sky

We’d left the bucket full of water the night before so we’d have it in the morning for laundry and when Lorraine took a look in the morning she discovered the tiny corpses of 2 mice that had gotten trapped. We used a stick to fish them out and buried them under a rock cairn. After the funeral, we packed up and headed out and up over Bishop Pass. It was time to finish our 6-day trip with our 3rd and final mountain pass.

Mule

Cowboy and Mule Heading down Bishop Pass

The climb up the pass was a steady breeze after the steep climb up into Dusy Basin the day before. We passed small sparkling lakes, mini meadows, small trees, the treeline, an automatic snow sensor, and a cowboy-hat-wearing wrangler leading a heavily-loaded mule over the pass to the JMT. The top of the pass featured an official sign, the first day hikers we’d seen in a few days, and spectacular views of the lakes on the other side of Bishop Pass.

Bishop Pass Sign

Bishop Pass at 11,972ft Elevation

Day 6 Bishop Pass

Day 6: Looking Down from Bishop Pass

The other side of the pass revealed a steeper, switchbacking trail covered in slippery stones down to Bishop Lake. The 3 of us met back up at the bottom of this stretch of trail, crossed a small stream, and headed down to Bishop Lake for a spot of lunch on the rocky shore. Every day of our trip revealed more amazing scenery, but the abundance of lakes in Bishop Pass really made it a pleasure to traverse.

Stream Crossing

Handy Stepping Stone Bridge

Bishop Lake

Walking by Bishop Lake

Day 6 Lunch

Ladies Lunching at the Lakeshore (Looking good after almost a week backpacking!)

Day 6 was going great, but we still had one small problem. How to get from the South Lake trailhead back to North Lake where our car was parked? We discussed our options at lunch: a) turn the trek into a loop and walk another 10 miles or so to end up back at North Lake (the downside being we had to walk on the road part of the way and it would add a half day); b) hitchhike; or c) walk down the road to a camp phone to call for a taxi or shuttle (note that shuttles can be booked in advance).  We optimistically chose option “b” because Lorraine had met a friendly hiker earlier in the day who kindly offered Lorraine a lift to North Lake when her daughter picked her up at the trailhead. As the fastest hiker, Lorraine generously agreed to go on ahead to the South Lake trailhead to try and catch up with the day hiker.

So many lakes!

More Lakes along Bishop Pass

We split up after lunch and continued down the pass towards South Lake passing smaller lakes left and right. It was easy to keep track of our progress because we just matched lakes with the map lakes. It got steadily greener, warmer, and buggier as the elevation dropped. There was a new lake or a trail to another lake around every bend.

Long Lake

Walking along the Long Shore of Long Lake

We all hiked pretty quickly down this last stretch of trail and didn’t stray too far apart. Anna and I finished the hike together and came out on South Lake in early afternoon. South Lake was the largest of all the lakes we’d seen on our trip, but also the most unattractive because the water level was so low—huge mud banks that must have been part of the lake bottom were exposed by the green-tinted water. It would have been a kind of disappointing finale if it wasn’t for the fall-tinted aspens lining the trail to the parking lot.

South Lake

Anna by South Lake

Miraculously, Anna and I met another friendly day hiker on this last bit of trail—part of a group of retired women that hiked together every week—who got her friend to agree to give one of us a lift to North Lake. We got the feeling they were not impressed with our planning skills, but they didn’t want to leave us stranded in the South Lake parking lot. It was lucky that we met this lovely group of women because when we arrived at the parking lot Lorraine was waiting with some bad news—the daughter of the other day hiker who had offered us a lift had hit a deer (the daughter was fine but her car was not).

South Lake Trailhead

Lorraine at the South Lake Trailhead (with our much lighter packs)

Everything worked out (thanks to some trail angels and 2 great hikemates!). Anna got a lift to her car at North Lake, her car was still safely parked there, and an hour and a bit later she picked Lorraine and I up from the South Lake parking lot. We all headed into the town of Bishop to eat pizza and salad (fresh veggies oh my!), buy shampoo and deodorant, and take a hot shower. It was the perfect end to a glorious 6-day backpacking vacation in the High Sierras! I’d definitely go back to Evolution Valley, Evolution Basin and Bishop Pass again.

(PS. It wasn’t quite the end because we drove back to the San Francisco Bay Area the next day via Mono Lake, but close enough.)

Trail’s End

Note: The parks office in Bishop has a lot of useful information including maps, phone numbers for companies that will shuttle you to your car, places to stay, and places you can take showers.

Posted in Backpacking | Tagged , , , , , , , , | Leave a comment

North Lake to South Lake Trek Day 5: Le Conte Canyon to Dusy Basin

Day 5: Le Conte Canyon to Dusy Basin in Bishop Pass
Mileage: ~9 miles
Elevation Gain/Loss: ~2,000 feet/~2,500 feet
Campsite: By first lake in Dusy Basin (an unnamed lake on Tom Harrison map)
Highlight: Walking through the enchanted woods and meadows of Dusy Basin
Watch out for: Arriving later in the day to find the best campsites taken

JMT Lake

Coming up on Breakfast Lake (Not Its Real Name)

It was still windy, cold and dark in our campsite when we woke on day 5, so we decided to pack up quickly and head down to a warmer spot for breakfast. We walked downhill for a bit, found a patch of sunny meadow on a lakeshore and had a breakfast picnic with hot coffee/tea. The meadow came complete with late season wildflowers, several small streams and lots of tiny frogs. This was actually one of my favorite mornings of our trip because we got an early start, still had a hot breakfast, and got to stop and enjoy an extra scenic spot. (Note to self: Keep this tactic in mind for future trips.)

Middle Fork River

Following the Middle Fork down Le Conte Canyon

After warming up out of the wind, we continued following the JMT/Pacific Crest Trail below the treeline down Le Conte Canyon. The trail shifted between steeper switchbacks and a gentler slope—heading steadily down alongside the Middle Fork River the whole time. There was a lot of nice camping along this section of trail, and we saw one site where some industrious campers had created stone sofas around a fire pit (they’d also lined a crack in a huge rock with a row of ragged “teeth”). One of the hardest parts of this trip was walking straight through so many places I’d love to spend a day exploring. This stretch of the JMT is definitely worth a repeat. We made good time and soon found ourselves in first Big Pete Meadow and then Little Pete Meadow as the trail turned south. Does it need saying? The open stretches of meadow were lovely and inviting.

Day 5 Meadows

Day 5: Heading Down from Muir Pass through the Meadows

Overall, we dropped around 2,500ft from John Muir Pass to the ranger station and trail sign for Bishop Pass. We had a question for the park ranger (Was Bishop Pass a good place to camp or was it as barren as the upper reaches of John Muir Pass?), so we followed the little trail towards the station. We came out of the trees to see a picture out of a storybook—a bearded ranger playing with his giggling toddler in front of a log cabin while deer grazed across the stream. It felt like we’d walked into a private moment and we all hesitated to interrupt, but Anna bravely took the initiative to approach with map in hand and the ranger kindly took the time to answer her questions (he said that there are a lot of good campsites in the pass and good fishing).  Interestingly, the ranger also remarked that it’s only the newer maps that leave so many lakes nameless (they do have names!).

Bishop Pass Trail Sign

Leaving JMT for Bishop Pass Trail to South Lake

Thus reassured, we took a quick lunch/water refill break at a nearby campsite (where we had to fight off a feisty chipmunk) and then left the JMT for the first time in 2.5 days. We took the trail to Dusy Basin in Bishop Pass and immediately started climbing ~2,000ft in less than 3 miles. The switchbacking trail gained height quickly, which means the views started right away—views of the waterfall next to the trail, the valley we were climbing out of and Langille Peak across the way.

Dusy Waterfall

Climbing alongside a Waterfall to Dusy Basin

Dusy Basin Break

The Upside to 2,000ft Climbs? Rest Stop Views

Langill Peak

Looking down at the Morning’s Hike on the JMT

This was the toughest climb of the trip, but the trail kept it interesting—snaking along waterfalls, through trees, up stairs and over a little bridge. The 3 of us spread out over the trail and met up at rest stops along the way and then finally at the top. The top of the trail kept looking like it was just around the next switchback, so it was a real relief to finally make it to Dusy Basin. We’d considered heading up higher into Bishop Pass on day 5, but after the climb and seeing how beautiful Dusy Basin was we decided to camp near the first nameless lake.

Dusy Basin Entrance

Near the Top of the Climb to Dusy Basin

Dusy Basin Lake

Small Nameless Lake in Dusy Basin

Our photos can’t do Dusy Basin justice because they just don’t capture how special it felt to walk over that last rocky outcropping into a meadow filled with small trees and bubbling brooks lit by the late afternoon sun. It felt like we’d discovered our own little enchanted forest valley hidden amongst granite peaks. We sat down by a clear stream flowing out of a small blue lake and watched dozens of fish leap into clouds of tiny bugs hovering over the water. We’d spent the entire trip trying to find the right place and time for Anna to go fishing and here we were (she’d carried a fishing pole and bait the whole trip). It was perfect.

Day 5 Campsite

Day 5 Campsite (Featuring Lorraine’s Tent)

We didn’t camp at the streamside, but continued on to a well-established rocky campsite walking distance from the larger-but-still-nameless lake. We saw several other groups of backpackers setting up camp around the basin, so we weren’t the only ones won over by its beauty. The wind started picking up as we set up camp, so Anna decided to wait until the next morning to go fishing. We were finally camping by a lake that we knew had fish in it and there was no way she was missing this chance. We found a windblock rock to have dinner behind and celebrated the longest any of us had been out backpacking under a starry sky.

Day 6 would be our final day on the trail—over Bishop Pass past a long series of lakes until our destination at South Lake (but there was still time for a little fishing).

Day 5’s End

Posted in Backpacking | Tagged , , , , , , , , , | Leave a comment

North Lake to South Lake Trek Day 4: Evolution Basin and John Muir Pass

Day 4: Evolution Basin, Evolution Lake and John Muir Pass
Mileage: ~11 miles
Elevation Gain/Loss: ~2,000 feet/800 feet
Campsite: By a small nameless tarn beneath Helen Lake (not recommended)
Highlight: Evolution Lake (You’ve got to see it to believe how beautiful it is!)
Watch out for: The exposed, campsite-lacking zone near the top of John Muir Pass (hence the emergency hut)

Day 4: Evolution Lake

Day 4: Evolution Lake

On day 3, I fell asleep to the sound of rain falling on my tent and on day 4 woke to condensation falling on my sleeping bag as the morning sun peaked through the pines. Our little trio took full advantage of a surprisingly sunny morning to dry out – happily decorating our campsite with laundry lines, tents, sleeping bags, ponchos, and clothes. It was a glorious morning and once we were all a little drier we started the ~900ft climb to Evolution Basin.

Daniella and Anna Evolution Basin

We are here: Evolution Basin

I’m glad we waited for a morning with clear skies to do the hike up to the basin because the views of Evolution Valley were spectacular. I couldn’t stop stopping to look, and met several other friendly souls suffering from the same problem. A fairly large group of hikers in their 50s, 60s, and 70s with envy-worthy day packs made the climb with us and were happy to chat as we all enjoyed the views. They explained that they were on a 7-day organized trip and the reason they had such tiny packs was because of the long mule train coming up behind them. I felt a little sorry for the mules that had to make 2 trips from the camp the night before to the next camp every day, but it seemed like a great way for people to see the backcountry of Kings Canyon National Park without carrying a heavy pack (hint to my parents).

Evolution Valley

Looking Back at Evolution Valley

We were blown away by the beauty of Evolution Lake when we made it over the last little hill and saw just one part of it shining below us. Evolution Lake is actually quite large and we were only seeing the bottom bulge with Mount Mendel towering in the distance. We immediately made our way down to the water’s edge and put our feet in. Who could resist that blue, blue water?

Anna at Evolution Lake

Welcome to Evolution Lake and Mount Mendel

Break at Evolution Lake

Anna Testing the Waters of Evolution

It was too early for lunch so we took a soak-in-the-scenery-with-a-snack break and seriously considered stopping there for the day (or a week). Alas, we had miles to go before our scheduled stopping point for day 4, so we put our boots back on and continued on around the lake. The trail climbed up above the left side of the long lake giving us beautiful views the whole way.

Evolution Lake Trail

Trail on Left of Evolution Lake (+tiny me and Anna)

Sadly, we eventually reached the end of Evolution Lake, crossed a stream feeding the narrow tip by stepping stone, and headed up deeper into the Evolution Basin. The good news was that we still had many more lakes to see under heavenly blue skies. The bad news was that we were behind schedule and would have to pick up the pace past all those lakes if we wanted to get over John Muir Pass that day. We had a quick lunch break at Sapphire Lake (where we hid from a strong wind coming down the pass and saw a marmot), but didn’t tarry long.

Evolution Basin Trail

Climbing up Evolution Basin to Sapphire Lake

The trail through Evolution Basin was above the tree line and climbed steadily up towards the pass under 13,000ft peaks. Every lake we passed was a shining jewel in a string of sapphires – we could see where Sapphire Lake got its name. It was an pleasure to hike this section of trail, but any burning desire to camp in that barren terrain died down under the constant onslaught of freezing wind flying down the pass. Maybe early fall isn’t the best time to camp up above Evolution Lake?

Wanda Lake

Climbing up John Muir Pass from Wanda Lake (Named after One of Muir’s Daughters)

The last stretch of trail to John Muir Pass is a short but steep and stony switchback ~500ft up, which tops out at the Muir Hut at almost 12,000ft. The wind was so strong up there that it immediately drove us inside the hut for a short victory break. I can see why an emergency shelter was built at this spot as a tribute to John Muir in 1931. The hut is freezing inside with only a filled-in fireplace, tiny window, and wide bench around the circumference, but if I was trapped up there in bad weather it would look like heaven’s parlor. Dusk was fast approaching – which might be why we saw a backpacker practically run by the hut without pausing – so we soon headed down the other side of the pass.

Muir Hut

Muir Hut at the Top of John Muir Pass (11,995ft)

It was even more barren on this side of the pass and there were no group campsites to be seen. We had planned on stopping at Helen Lake (named after John Muir’s other daughter) on the east side of the pass, but we didn’t see any campsites out of the wind that would fit all 3 tents, so we hurried onwards. The rocky trail headed steadily down but the landscape stayed barren, so once the sun had fully set we made the decision to set up camp on a flat spot by a nameless tarn rather than continue trying to follow the narrow trail in the dark.

John Muir Pass Dusk

Dusk Falling on the Barren Climb Down

Our campsite was surrounded on 2 sides by granite cliffs that unfortunately did more to funnel the wind through our campsite than to shelter it. We made dinner behind a tall rock and used our ponchos as windbreakers. My tent got partially knocked over by the wind several times in the night, which made for some rudely interrupted sleep (although the white noise of the howling wind was kind of nice). I’d highly recommend camping below the tree line on this side of the pass (in early fall at least). It didn’t matter if our campsite wasn’t perfect though; this was still one of the best days of the trip with unforgettably beautiful High Sierra scenery. Plus, the wind blew all the clouds away to reveal a crystal clear view of the night sky and the Milky Way.

Near Day 4 Campsite

Near Day 4 Campsite (the Next Morning)

Day 5 would bring over 2500ft of elevation loss down Le Conte Canyon, almost 2000ft gain  up into Dusy Basin and even more spectacular natural beauty.

Day 4’s End

Note on campsites: We know that you should always camp at least 100 feet from any water source and we did the best we could in the dark.

Posted in Backpacking | Tagged , , , , , , , , | Leave a comment

North Lake to South Lake Trek Day 3: Evolution Valley

Day 3: Evolution Valley
Mileage: ~10 miles
Elevation Gain: ~2,000 feet
Campsite: In Evolution Valley near Evolution Creek over Colby Meadow
Highlight: Seeing the meadows and peaks of Evolution Valley lit up between showers
Watch out for: That 1 mile climb 1,000 feet up into the valley

Day 3 Evolution Valley

Day 3: Evolution Valley under Rain Clouds

We had intermittent showers for most of day 3, but we woke up to soft sunshine so Lorraine and Anna bravely risked a quick dip in the South Fork. I only put my feet and face in, but I can attest that it was cold! They both swore it was refreshing and worth the shivering, so maybe it is a good way to start the day. We definitely all felt energized and ready for the climb into Evolution Valley that morning.

South Fork

The South Fork

Before the climb, we had several fairly flat miles to cover alongside the South Fork. It began to rain as we walked then stopped then started again. This was the only rainy day of our trip (and we had a break from the rain around lunchtime), so we were really pretty lucky with the weather.

South Fork Bridge

Anna and Lorraine Crossing the South Fork

Before the Climb

Anna at Evolution Valley Trail Sign

Those morning miles practically flew and we made great time to the South Fork bridge, to the Evolution Valley trail sign, and soon after to the base of the climb. We met a park ranger patrolling the trail near there — he lives in the Evolution Valley cabin over the summer season – and he warned us about possible thunderstorms later that day.

Morning Hike

View of our Morning Hike from Start of Climb

The climb up into Evolution Valley was steep but stunningly beautiful. Part way up the trail began to zig zag parallel to the Evolution Valley creek as it tumbled 1,000 feet down the granite slope. I went off trail for a close up look at the roaring white water and we all took a break at a convenient scenic overlook near the top.

Evolution Creek Waterfall

Evolution Creek Falling Down

After the Climb

Taking a Break

Soon after our scenic rest stop, the trail stopped snaking upwards and started following the creek into Evolution Valley. We came out of the trees where the trail optionally crosses the creek – I say optionally because the trail forms a “Y” and you have the option to cross or to continue walking along the right side of the creek. This option was created for rainier seasons when the creek crossing might be too dangerous or deep at this spot. We took off our shoes and crossed easily because it had been a dry summer and the creek was shallow and easy to ford.

Evolution Creek Ford

The Ford in Early Fall

Creek Crossing

Anna Crosses the Creek with Ease

It was a lovely spot, so we stopped for lunch on the opposite bank with some other backpackers who had the same idea. We spoke with one young man visiting from Israel who was hiking the John Muir Trail in 3 weeks and had gotten off the trail where we got on to refill on supplies in the town of Bishop. Richer backpackers can pay to have their supplies delivered by mule along the trail, but he was clearly on a tight budget. Now that I’ve been to Israel (we are living in Tel Aviv for few months right now) I’d guess that he’d recently left his mandatory service in the IDF (Israel Defense Forces) and was doing some world traveling before returning to Israel for school/work (much like many young Americans and Australians go backpacking around Europe after college). This one young man might have been doing his backpacking the hard way, but we saw plenty of backpackers taking advantage of mules. We saw single mules carrying resupply caches for backpackers, a mule train carrying all the supplies for some older hikers (which allowed them to do a 7-day trip with day packs), and lots of gates across the trail meant to stop escaped mules from wandering too far.

Mule Gate

Why are there all these gates on the trail? Look a mule! Oh, right.

The rain kindly waited for us to finish lunch before starting up again and hurrying us onwards into the valley. Evolution Valley is a part of the Evolution Region – the area around a series of mountain peaks named after famous supporters of the theory of evolution (e.g. Mount Darwin). It’s a dream destination for backpackers because a) it’s beautiful and serenely peaceful; b) it’s along the iconic John Muir Trail and Pacific Crest Trail; and c) it’s isolated and hard to get to so you only have to share it with mules and other backpackers. The trail stays near Evolution Creek as it winds through pines trees and opens on a series of sprawling meadows against a backdrop of mountain peaks. I’d love to visit the meadows again in the summer when the wildflowers are blooming and just spend a full week in the valley soaking it all in.

Evolution Valley Creek

Evolution Valley Creek

Evolution Valley Meadow

Evolution Valley Meadow

Our plan had been to hike straight through Evolution Valley and up the steep climb to Evolution Lake all in one day, but the on-and-off showers and the threat of thunderstorms convinced us to camp at the upper edge of the valley instead. The beauty of the valley was also kind of alluring. Almost all the campsites just off the trail were already taken, but once we started heading up away from the meadows we saw fewer people. We ended up choosing a large site close to Evolution Creek above Colby Meadow. It was at this point that I realized the downside to backpacking with only a rainfly and no ground cover – mud! Luckily, I was able to find a fairly dry, pine-needle padded spot to set up my tent. We all hunkered down under a friendly old pine that kept off the rain for a hot dinner and hot drink before bed. Tomorrow on day 4 we would get to see Evolution Lake and the Evolution Basin – some of the most beautiful scenery in the Sierras!

Day 3 Campsite

Day 3 Campsite (The Morning after the Rain)

Day 3’s End

Note: The John Muir Trail website has a nice description of this section of the JMT in Evolution Valley and Evolution Basin.

Posted in Backpacking | Tagged , , , , , , | 1 Comment

North Lake to South Lake Trek Day 2: Piute Canyon

Day 2: Piute Canyon to John Muir Trail
Mileage: ~12 miles
Elevation Loss: ~3,000 feet
Campsite: Where Piute Creek meets the South Fork (we camped along the South Fork)
Highlight: Following Piute Creek down the canyon all day through pines, aspens, meadows and granite
Watch out for: Slippery shards of stone on the last couple miles

Day 1 Campsite

Day 1 Campsite by Golden Trout Tarn

Day 2 of our trip dawned picture perfect, or so I assume because it was looking beautiful when I finally ventured outside to join Anna and Lorraine. I love lying in my sleeping bag at sunrise watching the day’s first light shine through the tent wall – it’s like looking up through a stained glass window made of nylon. The night had been chilly with a little light rain, so it was nice to enjoy that morning warmth snug in the tent. We took our time that first morning savoring everything – sun, crisp air, blue sky, glittering lake views, glacial divide mountains, hot drinks, and oatmeal. We even had fun doing our first load of laundry in a collapsible bucket and tying Day 1 socks and underwear to our packs to dry while we hiked.

Day 2 Morning Piute Pass

Day 2 Begins in a Barren Basin under Blue Skies

We got a late start, but weren’t worried because our 12 mile walk out of Humphreys Basin and into Piute Canyon was almost all downhill. It made for a nice day 2 because we were able to cover some distance while slowly acclimatizing to the elevation and the trip. We stopped often to enjoy the views down the canyon, take photos and say hello to the sporadic backpackers we met on the trail—gone were the day hikers and trail runners. We met one woman going the other way who offered to drive Anna’s car from the North Lake trailhead to South Lake (where her car was parked and we were heading) if we would just lend her the keys (which she would then hide by the car)—Lorraine and I considered the idea carefully but for some reason Anna decided not to give her car keys to someone she had just met. 😉

Dream Team in Piute Canyon

The Dream Team: Me, Lorraine and Anna at our First Trail Sign

The day’s trail began in a barren basin at 11,100 feet before gently heading down into pine-lined Piute Canyon. After a few hours we reached Piute Creek, which we would walk alongside for the rest of the day. We hit our first official trail sign not long after and asked a father and daughter waiting for the rest of their family to take the only photo from our trip that includes all 3 of us. There hadn’t been a sign marking any of the smaller trails we’d encountered before this (the trail to the Golden Trout Lakes was also missing from my Tom Harrison map), so we were unusually enthusiastic about finding a trail sign. We hit our 2nd trail sign in a meadow where we came across our first aspens of the day. It was still early September, so the aspen leaves had just a kiss of neon yellow along their edges.

Aspens

Early Fall Aspens in Piute Canyon

Piute Creek

Anna by Piute Creek

Day 2 Piute Canyon

Day 2: Following Piute Creek Down Piute Canyon

Farther on, the meadow narrowed and granite slopes closed in around the trail and creek. The dark blue of the water against the light-colored granite just got more beautiful as we walked. Near the end of the day, we reached a gentler slope covered in berry-bespotted manzanita shrubs and saw our first bear sign – a pile of droppings filled with berry seeds. It was just after the manzanita hill that the trail became covered in broken slabs of slippery stone. This short section of trail slowed us down and all 3 of us managed to take a minor tumble at some point – I think I may have been the only one to fall straight on her ass though. Luckily, we sustained only minor injuries – to our dignity – and we made it to our destination before dusk.

Last Trail Sign

Anna and I at the John Muir Wilderness Border

Our destination for the day was where Piute Creek met the South Fork and our trail bisected the John Muir Trail. We could tell we had reached a fancy trail because there were several trail signs and a real bridge. As we crossed the bridge, the sound of a lone backpacker playing a recorder in a nearby grove welcomed us to the other side of the creek we’d been paralleling all day. It was a popular campsite and felt crowded after hours of not seeing any other hikers—when I say crowded I mean there were probably 4 small groups. We decided to camp a little farther down the John Muir Trail on the South Fork because the best spots had already been taken by the bridge. We found an established campsite in the trees near the stream and quickly set up our tents, filtered some water, had a hot supper, and went straight to sleep feeling completed satisfied. We’d gotten into a groove and reached our goal for day 2! On day 3 we would enter Evolution Valley.

Day 2 Campsite

Day 2 Campsite on South Fork

Day 2’s End

Note on stream crossings: We crossed dry streambeds and small creeks several times throughout the day, which in wetter seasons might result in some wet feet.

Posted in Backpacking | Tagged , , , , , , | Leave a comment

High Sierras Backpacking: North Lake to South Lake (via Evolution Valley) Overview

Trip Overview, Itinerary, and Day 1 Description:

Daniella and Anna Evolution Basin

We are here: Evolution Basin 🙂

Total Mileage: ~57 miles
Total Elevation Loss/Gain: ~9,500 feet (a few hundred feet more gain than loss)
Length: 6 days
Trailhead: We started at North Lake at Piute Trailhead (~9,400 feet)
Mountain Passes: Piute, Muir and Bishop
Special Considerations: This trek requires a car shuttle, shuttle service, or hitchhiking (or it can be turned into a loop with some walking on roads and an extra ~10 miles). Bear canisters are required.
Permit: Wilderness permits are required. We reserved online and picked up our permit at the White Mountain Ranger Station in Bishop, CA.
Map: I used the Bishop Pass Trail Map by Tom Harrison Maps.
Books with a Trip Description: 1) Trekking California by Paul Richins Jr. (we brought along this trip description); 2) The High Sierra: Peaks, Passes, and Trails by R. J. Secor; and 3) Backpacking California by Wilderness Press
Great Place to Post Questions: High Sierras Online Forum

Last February, while backpacking with friends at Sykes Hot Springs in Big Sur, we asked a group of experienced backpackers also enjoying a soak, “What is the most beautiful place you’ve ever been backpacking in California?” or maybe “What is your favorite week-long trip in the High Sierras?” I don’t remember the exact question, but I do remember their response: Evolution Valley.

It’s good to have a dream and our group of friends now had a shiny new backpacking dream trip. After we got home, we looked up Evolution Valley in our backpacking guide books and found the classic South Lake to North Lake trek (we later decided to mix it up and go North Lake to South Lake because some say the views are better this way) that goes right through Evolution Valley. My friend Lorraine—founder of the Bay Area Women’s Backpacking Meet Up Group—was as usual the most proactive and instead of just dreaming about the trip she went ahead and booked the permits for early September. Our dream trip had a date!

Dream Team in Piute Canyon

The Dream Team: Me, Lorraine and Anna at our First Trail Sign on Day 2

Sadly, not everyone involved in the early planning was able to make it, so we ended up with a dream team of three—Lorraine, Anna, and me. We set out mid Saturday in one car, camped in a county campground at 4,000 feet for the steep price of $10 a site, arrived in the little desert town of Bishop Sunday morning, picked up our permits, picked up some baked goods at a local German bakery (try the fresh orange juice not the heavy chocolate croissants), drove up the SR 168, took the one-lane road to North Lake, and walked through the North Lake campground to the Piute Trailhead. At 12:30pm on Sunday, September 1 we started our 6-day adventure with a 5 mile hike ~2k feet up to the top of Piute Pass at 11,423 feet. We hadn’t spent any time acclimatizing to the elevation, so we took that first climb slowly and stopped to chat with many of the people we met along the way. We passed and were passed by day hikers, overnight/weekend campers with fishing poles, other backpackers doing the same trip, and American Conservation Corps workers shoveling giant rocks with their mule and dog companions. The cloud-speckled views from both sides of our first mountain pass made the whole climb worthwhile, and we grew giddy at the thought of even more spectacular views to come (looking back the elevation may have had something to do with all that giddiness).

Piute Pass Lakes

Looking up Towards Piute Pass

This 6-day trip was the longest that any of us had been out, so we all spent weeks preparing and planning. It took me at least two weeks to squeeze a week’s worth of food into my small plastic bear canister, to build a wilderness first aid kit that contained more than my normal band aids and blister aids, and to cut down the weight of my pack to the minimum possible. Since this was a trip of firsts, I decided to try leaving the bulk of my Go-Lite tent behind and just bringing the rainfly. My pack still weighed 32lbs at the start with water and food, so I wouldn’t call it ultra-light.

Day 1 Campsite

Day 1 Campsite (Green is me!)

That first night we camped on the other side of Piute Pass by one of the small nameless, glacier-built tarns above the Upper and Lower Golden Trout Lakes. We’d only covered about 6 miles, but we’d made quite a bit of vertical progress and felt good. I fired up my JetBoil and we lingered over hot meals of dehydrated food, herbal tea and a little white wine that Anna had heroically carried up the pass in her nalgene. I ate the only packaged food I had brought—a Backpacker’s Pantry Organic Spinach Puttanesca—so I could reuse the packaging to cook my other dinners as the week went on. We’d been hearing the bark of thunderclouds and it looked like rain, so Anna wished everyone sweet backpacking dreams around 9pm and we all snuggled into our down sleeping bags with everything battened down. Our 6-day trek had finally begun, and we were only a day away from Evolution Valley.

Our 6-Day Itinerary in Hindsight*:

Day 1 up and over Piute Pass = ~ 6 miles and over 2,000 feet elevation gain; campsite by the Golden Trout Lake tarns
Day 2 down Piute Canyon = ~12 miles and over 3,000 feet elevation loss; campsite near where Piute Creek meets the South Fork (we camped along the South Fork)
Day 3 up through Evolution Valley = ~ 10 miles and just under 2,000 feet elevation gain; campsite in Evolution Valley near Evolution Creek over Colby Meadow
Day 4 up Evolution Basin and over Muir Pass = ~11 miles and almost 2,000 feet elevation gain and 800 feet loss; campsite by small nameless tarn beneath Helen Lake
Day 5 down Muir Pass and partway up Bishop Pass = ~ 9 miles and almost ~2,500 feet elevation loss followed by almost 2,000 feet elevation gain; campsite in Dusy Basin by first lake
Day 6 over Bishop Pass to South Lake Trailhead = ~9 miles and ~1,000 feet gain over Bishop Pass followed by a ~2,000 feet loss

*I’ve just guesstimated the elevation gains and losses here. See official trip descriptions in one of the books listed at top for more accurate counts.

One Photo from Each Day:

Day 1

Day 1: Lorraine and me at Loch Leven on the way up Piute Pass

Day 2 Piute Canyon

Day 2: Following Piute Creek Down Piute Canyon

Day 3 Evolution Valley

Day 3: Evolution Valley under Rain Clouds

Day 4: Evolution Lake

Day 4: Evolution Lake

Day 5 Meadows

Day 5: Heading Down from Muir Pass through the Meadows

Day 6 Bishop Pass

Day 6: Looking Down from Bishop Pass

These photos highlight some of the beautiful scenery we saw each day of our trekking trip, but they don’t really capture it all. The posts that come after this one will have more photos from days two to six. The three of us shared one camera and took turns carrying it on different days, so you get to see photos from each person’s perspective. Photographer credits go to us all. 🙂

Posted in Backpacking | Tagged , , , , , , , , | Leave a comment

Backpacking Haleakalā: The Summit to Palikū to Halemau’u Trailhead

Campsite: Palikū (Site has water and holds up to 25 people)
Permit: Free permits are first-come first-serve before 3pm daily from ranger stations
Mileage: Day One = 9.3 miles; Day Two = 10.4 miles
Elevation Loss/Gain: 3,360/1,620 feet
Trails: Start on Sliding Sands and return on Halemau’u (requires a car shuttle or pick up)
Map and Details: http://www.nps.gov/hale/planyourvisit/wilderness-camping.htm

In May 2012 Chris and I were lucky enough to spend a week on the Hawaiian island of Maui, and although we spent plenty of time at the beach we also made a brief two-day foray inland. What was worth deserting the Maui coastline for? A backpacking trip into the heart of Haleakalā — an ancient shield volcano whose highest peak rises over 10,000 feet above the island (also home to one of my favorite plants on earth).

Haleakalā Silversword

Isn’t the Silversword the most beautiful plant ever?

This ~20 mile roundtrip hike 3,360 feet down into a deep depression from the southeastern side of Haleakalā’s summit isn’t for everyone. I’ve spoken to hikers who found the trip monotonous and barren with a little too much elevation change. Did I also mention there is almost a 100% chance of rain once you reach the rainforest? Personally, we loved every minute of it. What’s not to love about lunar lava landscapes, rainbow-colored sand, the transition from desert to rainforest, endangered attack geese, and a plant so rare it grows nowhere else in the world? However, it’s possible you may need to have lived in a desert landscape like Arizona or Iceland to be able to look beyond that first 4 miles of sand (/warning).

Windy Summit

Look! My Pants Turn into Parachutes in ~50mph Gusts

What do most tourists come to see at Haleakalā? The summit at sunrise. It’s genuinely astonishing how many people and cars manage to cram into a couple small parking lots near the summit at 4am every day (get there early if you want a spot). Not that I blame them, it is pretty fun to go from a hot and humid sea level to a blanket-festooned snuggle fest at 10,000 feet in less than two hours. Plus, the sunrise can be spectacular. Even more astonishing? How empty those parking lots are 15 minutes after sunrise. We came up with the brilliant — and slightly masochistic — plan to arrive in the pitch-black pre-dawn, see the sunrise, pick up permits, and start hiking. This plan worked pretty well except for two things: 1) The rangers at the summit refused to give us a permit until 8am because they wanted to be available for the sunrise tourist crowd (they did give us the option to drive down to a lower ranger station to get a permit). 2) It was freezing with winds gusting up to 40-50mph.

Looking Up Sliding Sands

Sliding Sands Trail

Luckily, the rangers relented around 7am (because everyone had already left) and let us watch the “Leave No Trace” video and fill out the permit paperwork. Unluckily, the wind was not letting up. We decided to go anyway because how bad could it be hiking on a sandy trail with wind blowing grit straight into your eyes?  It was pretty funny because as soon as we put on our packs and headed out on the trail two local guys hiding from the weather in their truck gathered their courage and headed out right behind us with their backpacks. Fortunately, once we got off the summit the wind dropped dramatically.

Silverswords, Sliding Sands, and Sky Oh My

Silverswords in their Natural Habitat on the Sliding Sands Trail

We started our hike from the summit on the Sliding Sands Trail, which zigzags 2,500 feet down a sandy slope for 4 miles. Sliding Sands is basically a steep desert, but the views of the valley and the plants that manage to survive there make it all worthwhile. There is one plant in particular that deserves a mention — the threatened and protected Haleakalā Silversword. This silvery succulent grows nowhere else in the world, lives 20 to 90 years, flowers only once in its lifetime (when it produces up to 600 maroon flowers), and sparkles like a metallic jewel in the summit sunlight. I may have a plant-crush on the Silversword.

Silversword in Bloom

Once in a Lifetime & Out of Season

Silverswords tend to flower between July and October, but we were lucky enough to come across a single flowering plant right next to the trail. To be honest the furry flowers are not the best feature of this sleek silvery marvel, but when you know you are seeing the only flowers that plant will ever produce they take on an increased significance. Sadly, the Silversword may be declining because of climate change.

The Lava Field Stage

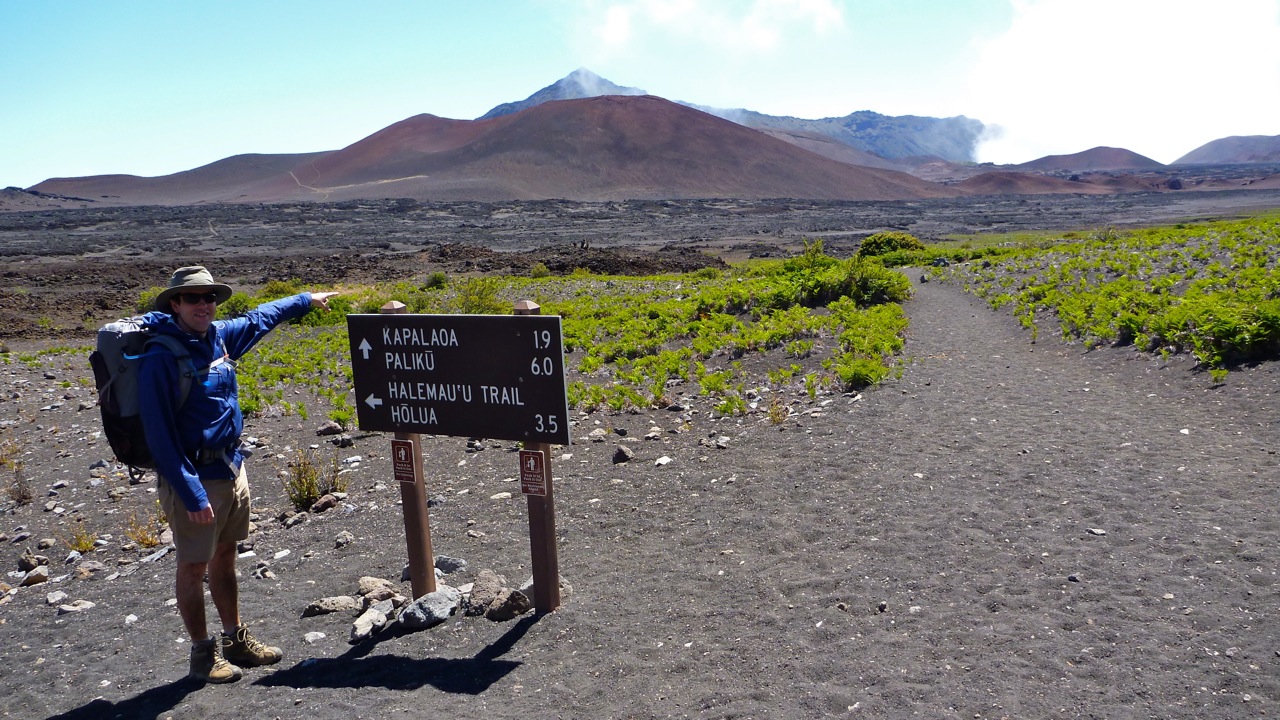
Chris Points the Way to Paliku

Unsurprisingly, the four miles straight down go quickly and quite suddenly you hit a flat plateau of sand and rocks of a different color. Most day hikers don’t make it this far down because for some reason they are averse to the 2,500 foot climb back up, so this can be a nice lonely stretch of lava fields. The sign informed us that there were only six miles left to Palikū campsite, and we gratefully embraced the scenery and slope change.

Lava Fields Flower

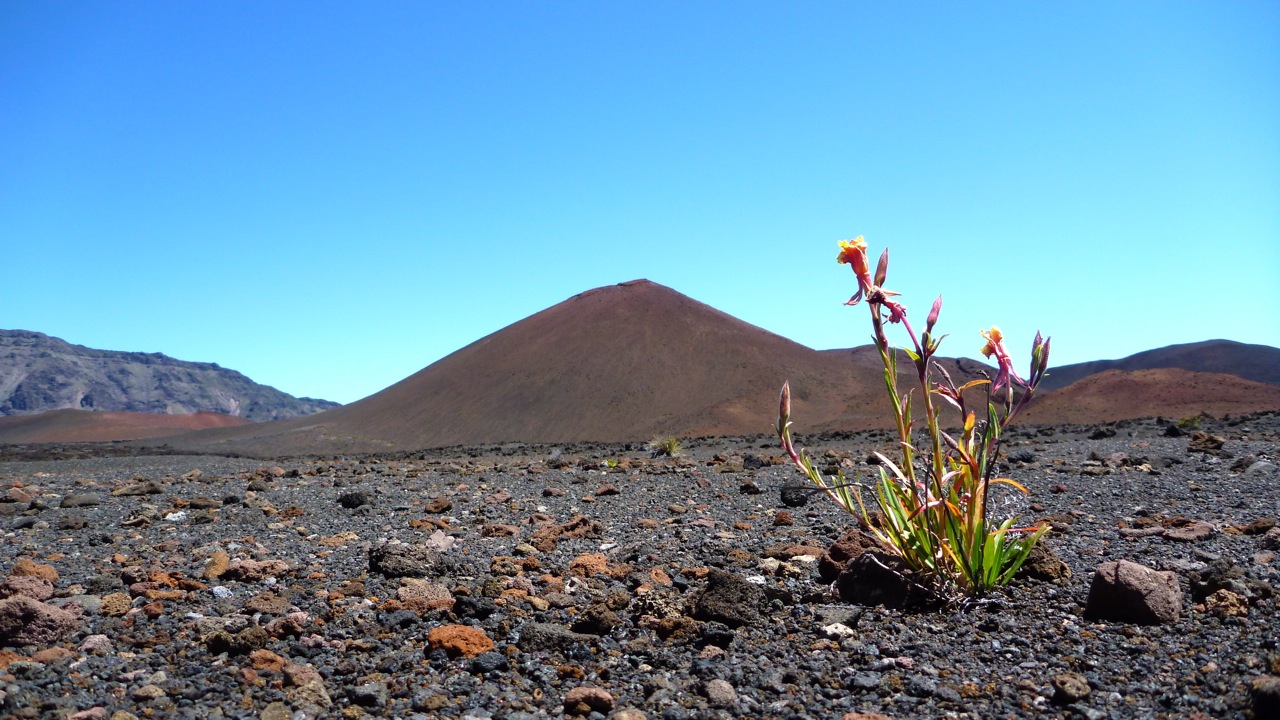
Life in the Lava Rocks!

It’s always a surprise when life pops up in such an inhospitable landscape, and the life in Haleakalā was unusually beautiful – especially for plants that have to survive in fields of rock and sand. I was taking note of every plant I saw in the black lava fields — I may even have gotten down on my knees for a closer look at some — when we hit the next transition point on the hike and suddenly the color of the dirt changed yet again and there was grass everywhere. We were slowly approaching the rainforest and could see more green (and clouds) in our future, but before the forest came the grasslands and then shrub and chaparral lands.

The Trail Continues

From Lava Fields to Grasslands

Ecosystem #3 Approaches

On the Edge of the Rainforest

The closer we got to Palikū — which sits at the edge of the rainforest and the start of the next steep ascent down to the sea — the more the landscape began to change. We ran into our first cabin and campsite area — Kapalaoa — at the border between the grass and shrubby rocks. Haleakalā National Park has three bunk-equipped wilderness cabins with such luxuries as a picnic table, stove, and outhouse that you can reserve up to six months in advance ( it’s a good idea to reserve early because they book up fast), which would probably be fun with a larger group. We took a short break at the Kapalaoa picnic table before the final stretch. After the cabin, we left the flatlands for the bumpy lands and went up, down and around a series of tiny hills following a general downward slope towards the edge of the crater.

Rainbow

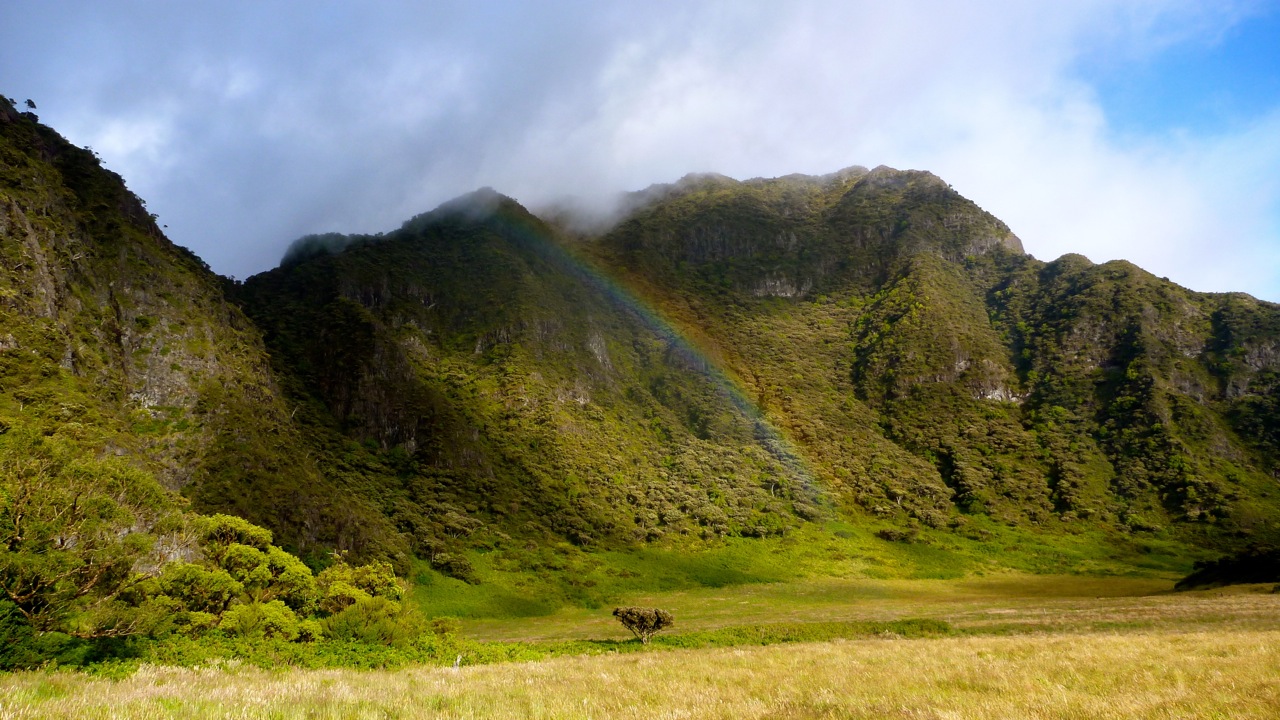
Rainbow’s End Where the Rainforest Begins

We reached Palikū and the rainforest in the early afternoon with plenty of time to explore the area. The last stretch of trail to Palikū is shrouded in greenery before opening up to a lovely tree-lined meadow where flattened grass marks established tent sites and the cabin nestles amongst the trees on the right side of the field. We were the first people to Palikū that day (spring is a nice time to go to avoid the crowds), so we got our choice of campsites. The second people to arrive were the two local guys we had been playing leapfrog down the trail with, but since they were carrying ice and beer the weight of their packs slowed them as the day went on and they didn’t get in until much later. They informed us that this was their one and only annual backpacking trip and that they were going to continue all the way down the Kaupo trail to sea level the next day.

Paliku Campsite

Our Private Enchanted Glade at Palikū

We were examining a potential campsite in the top right of the open meadow when I noticed a fallen log guarding the entrance to a private glade almost completely hidden from sight (it was on the hill above the water spigot and to the left of the cabin). It was the perfect site — exactly big enough for one tent, enclosed on three sides by tasty berry bushes for privacy, just high enough to keep us out of the rainforest mud, and possessing one bench-like log as a substitute front door. We immediately set up camp in our little rainforest hideaway and settled down for an afternoon nap (to be fair we did get up at 2am that day). As we dozed it began to drizzle, which just made our campsite feel even more homey. (Note: In case you ever stay at Palikū the outhouse is on a muddy path hidden in the foliage behind the cabin on the right side before the bridge.)

Endangered Geese

What’s so cool about these geese? They’re rare geese.

Palikū is a beautiful place to spend a lazy afternoon and night as long as you come prepared for rain — keep an eye out for rainbows! We spent at least 20 minutes just watching the Nēnē — endangered Hawaiian geese — posture and guard their territory, which happened to be the lawn in front of the cabin near the water spigot. We had to wait for them to get their water first before we could fill up (yes, I may have been slightly afraid of the geese after they charged us for passing through their territory). There were signs saying don’t feed or water the geese, but I’m not sure how or why we were supposed to stop them from getting water (especially since we were in a rainforest with a creek running nearby). There was no way I was starting a territory fight with the Nēnē.

Day 2 Trail

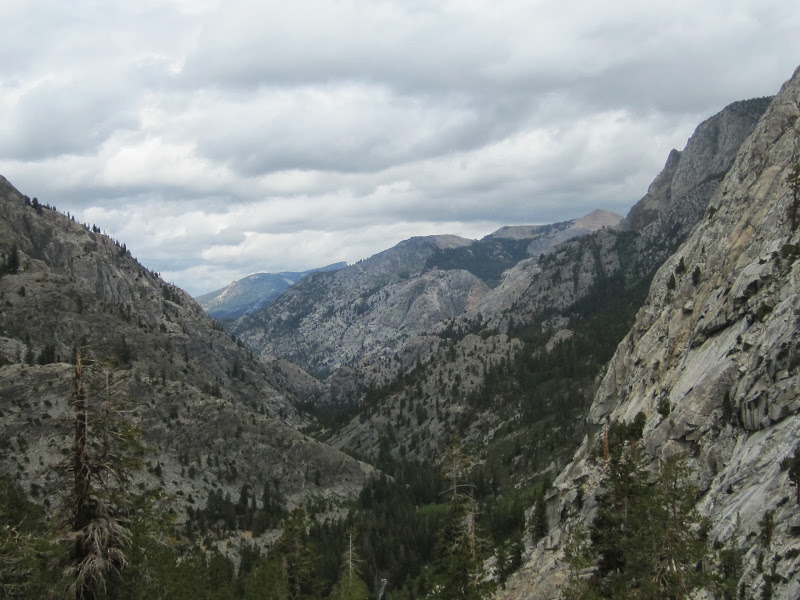
Day 2: Looking Back Towards Palikū

The next morning I was loathe to leave our little rainforest glade, but it was a beautiful day and we had a long way to go if we were going to meet my parents on time at our rendezvous point at Kalahaku Overlook. We chose that meeting point so that we could take a different trail on day two and because it meant we only had to climb around 1,600 feet instead of 2,500 back to the summit.

Rainbow Sands

The Trail through Sand

We took the Halemau’u Trail on day two and it went past some amazing sites — a rock that looked like a dragon up on a cliff, a labyrinth of dead lava, rainbow-colored hills of sand, the “Bottomless Pit” featuring some of the multi-colored sand (see trail map for location), and of course the “Silversword Loop”. The short Silversword Loop was a detour of less than a mile that took us by small clusters of that most illustrious plant spread out along the trail — I thought it was definitely worth the detour and I may have taken an unreasonable number of photos. It is only with great restraint that I am limiting myself to posting a single photo here.

Silversword Loop

Silversword with a View

View Out of Lava Field

Approaching the Climb Out

Haleakalā National Park kindly asks visitors not to go off trail or defecate on the delicate landscape because natural processes move very slowly in this volcanic area and the damage could last decades or more. For this reason, we waited until we reached the outhouse at Holua Cabin before using the restroom and even braved the stinging insects guarding the entrance. There is very little water in this part of the park, so insects are attracted to the water spigots and outhouses.

Wilderness Cabin

Taking a Break Outside Holua Cabin

Holua Cabin was our last stop before the climb out, which went straight up from a flat field. On our way up, we actually met a rowdy party of locals climbing down to spend a few days partying at Holua Cabin — they lied and told us we were almost at the top after just one more bend. Liars! Never trust the people walking downhill when they tell you it’s not that far to the top.

The Climb Out

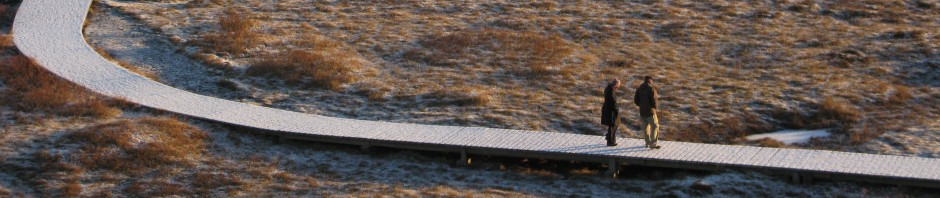
Climbing Out of the Volcano

The climb out was needless to say a good workout, but the views as we went higher and higher got ever more spectacular which made it all worthwhile. The trail was also graded pretty nicely and it went all the way around the peninsula of rock, so we got views from both sides. It felt very satisfying to reach the top and look down to see where we had just spent the last two days looping around.  I highly recommend taking a couple days from a beach-side Maui vacation to do some backpacking in Haleakalā National Park. There really isn’t anything quite like Haleakalā’s plants, animals, rocks, and views anywhere else in the world.

The View from the Top

Celebrating the End of the Climb + Hike with a View

Posted in Backpacking | 1 Comment

Day Tripping by Reykjavík: Hveragerði & Lava Tube

What do you do after driving a camper all the way around Iceland in six days? Return your rental RV, pick up a rental car, and drive 35 minutes from Reykjavík to a town where you can boil eggs, bake bread, and soak your toesies in a geothermal playground. Hveragerði is home to a giant rundown greenhouse with ice cream and parrots, a geothermal park in the center of town, bakeries selling bread baked in hot springs, and a hiking trail leading to a valley with a river of sweet, sweet hot water.

Reykjadalur

Between the Hot Springs Valley and the Town

Just a couple miles outside of Hveragerði is the trail head marking the start of the hike to Reykjadalur (Smokey Valley), a geothermal valley famous for boiling mud pits, clouds of smoke-like steam, and a naturally-heated river perfect for bathing. Chris and I had done the hike  once before and spent a blissful afternoon soaking in the hot river and hiking around the valley, but this time we only walked a short way up the trail to the first warm spring-fed hot pot five minutes from the dirt parking lot.

Hveragerði

Hveragerði Hot Pot

Dad’s leg was injured, so after a short walk exploring the warm springs, wild cotton, and green hills we headed back to town for the thrifty person’s version of a spa day. Chris and I had never been to the Geothermal Park in the center of Hveragerði before because why visit a tourist  trap when you can hike up to soak in an entire heated river? I admit we’d made a mistake. The Geothermal Park wasn’t so much a tourist trap, as a tourist oasis (on a quiet day anyway).

Hveragerði Geothermal  Park

We Visit the Hveragerði Geothermal Park

We started our self-guided tour in a little greenhouse and cafe with an exhibit about geothermal hot springs. Dad and his injured leg didn’t make it past the cozy cafe where you can buy a single egg to boil in the hot springs for about a dollar. While he waited patiently, Chris, Mom, and I continued on into the park to see the boiling mud pits, colored sands, sink holes, hot springs, and steaming pools and pipes.

Hveragerði Geothermal Center

The Official Spot to Boil an Egg at the Hveragerði Geothermal Park

When we were done wandering the garden paths through the park and reading about geothermal features and energy my mom surprised us with a treat. She had purchased us all some time in the foot mud baths for the extravagant amount of around $15 a person. That fee included access to the special geothermal mud boxes, a fancy wooden bench to sit on, a spatula and hose for after-mud foot cleaning, clean towels, and finally the right to soak our now mud-free feet in the biggest pool of the hot springs.

Mud Pit at Hveragerði Geothermal Center

Geothermal Muddy Foot Spa

It was a blast; definitely worth the price of admission. The mud was super slick and slippery with a cold layer on top that got warmer the deeper you pushed your feet. I don’t know if we had more fun squelching the mud between our toes all the way up to mid calf or trying to scrape it all off with a couple of spatulas. Everyone that walked by looked at us enviously, and on a busy day I’m sure that the mud foot spa has a long line. Luckily for us, we got to the park early on an overcast day with a hint of rain and were able to take our time.

Mud Spatula at Hveragerði Geothermal Center

Hi-Tech Mud Scraper-Offer Spatula

It’s not easy to get that much mud off your feet and legs with a spatula while trying not to wash away such a valuable commodity, but it’s certainly amusing to watch someone try. The pay off after all that work was the moment when we got to slip our now chilly but tingly clean feet into the steaming water of the hot springs.

Spa Time Hveragerði Geothermal Center

Mom Moves to Hot Springs Foot Spa Stage While Chris Finishes His Foot Detailing

We must have spent at least an hour muddying, un-muddying, and soaking our feet in the greenish geothermal pool. From our wooden perch by the side of the hot spring, we could see the whole park and our feet had view of the whole algae-swirled pool. I know what our feet saw because I took a photo from their perspective with our waterproof camera. By the time we left our feet were as soft and wrinkly as champagne raisins.

Underwater Hveragerði Geothermal Center

Foot’s Eye View of Hot Spring at Hveragerði Geothermal Center

After our spa treatment on the cheap, it was time for lunch so we headed to a nearby bakery known for its geothermal-baked rye bread. The window display lured us in with fresh pastries and marzipan sculptures of children’s story characters and adults sexing it up (not in the same sculpture). The sandwiches were good, too.

Hveragerði Bakery

Yes, That’s a Sex Scene Sculpted in Marzipan in the Bakery Window

We did a little more sightseeing in Hveragerði (we briefly got caught in the tourist trap that is the giant geothermal greenhouse where some sad looking plants and parrots entertain tour buses) and then drove south past the main highway to find a kilometer-long, partially-collapsed tunnel in the ground. I’d been wanting to explore a lava tube ever since we came to Iceland and there just happened to be one — Raufarholshellir — around 20 minutes from Hveragerði. It’s difficult to see a hole in the ground from the road, so we kept a sharp eye out for a sign in a gravel lot on the right side of road 39 (there isn’t much else around but open country).

Lava Tunnel

Instruction Sign at Lava Tube

This particular lava tube is thousands of years old and said to be one of the largest you can explore in Iceland. In winter it supposedly fills with icicles and ice formations, which I would love to come back and see someday. The cave has multiple entrances, but the easiest one to access seemed to be the entrance right next to the sign just off the road.

Caved in Ceiling at Lava Tunnel

Chris Standing on Caved in Ceiling of Lava Tube

Our guidebook recommended helmets and headlights for any cave exploration, so we brought our backpacking headlights. Because my parents were waiting outside the cave, we only explored the first part of the tube. The ceiling had partially collapsed in several places letting in beams of soft sunlight, and making it difficult to traverse the rocky floor. It was amazingly beautiful and a little eerie to stand in the ruin of a tunnel that looked like it could have been built by people, but was formed by hot lava long before anyone had settled on Iceland.

Chris and I in the Tube

Chris and I Lighting Up the Lava Tunnel

A little cave exploration was the cherry on top of a perfect day trip, and one of my parent’s last days in Iceland. Chris and I always meant to go back to that lava tube to do some more exploring while we lived in Reykjavík, but we never had the chance. I guess someday we’ll just have to go back to Iceland to finish what we started.

Day’s End

Posted in Travel Tips | Tagged , , , , , , , | Leave a comment

Iceland’s Ring Road: Day Six or The End

Day Six – The North Coast Back to Reykjavík: Akureyri to Borgarnes to Reykjavík

Akureryi Campsite

Our Last Ring Road Campsite

On the last morning of our trip driving an RV around Iceland’s Ring Road we had breakfast in a flower-lined meadow, packed up our outdoor dining room for the last time, and headed down the hill into Akureyri — the capital town of Northern Iceland — to do a little souvenir shopping. There is really only one main street lined with galleries, boutiques, restaurants, bookstores, flower pots and murals in downtown Akureyri, so it doesn’t take long to explore. I purchased an original oil painting of a girl in a lime-green dress for around $35, my mom picked up a violet-bedecked teapot from an extremely hip thrift store, and my dad got us some Icelandic pastries to have with coffee on the road. Iceland has a strong tradition of arts and crafts, which means you can buy locally-made art in a competitive marketplace. However, Iceland is still an expensive place to visit, so prices on things that aren’t handmade art or thrift store finds may discourage excess souvenir buying.

Akureryi  Church

The Church in Akureryi — Designed by Same Architect as Reykjavik’s Cathedral

While living in Iceland we visited Akureryi thrice, and enjoyed ourselves every time. The brightly-painted, primary-colored downtown street is full of art, books, and cafes; the botanical garden is a haven for seasonal flowers; and Akureryi’s location at the tip of a fjord between mountains makes it an unbelievably beautiful place to camp in the summer and go skiing in the winter.

Downtown Akureryi

Downtown Akureryi

After packing away our precious purchases, we climbed into the RV for the last leg of our trip — a five hour drive back to Reykjavik. We stopped a couple of times to stretch our legs, but it wasn’t until we reached the town of Borgarnes an hour north of Reykjavik that we really did any sightseeing. Borgarnes is a seaside town topped with a church on a hill that is best known for the very-touristy but well-designed Settlement Centre, which tells the stories of Iceland’s settlement and first poet Egill Skallagrimsson. Chris and I had already visited the centre and eaten soup and freshly-baked bread at the excellent restaurant upstairs once before, so this time we explored the town by foot while my parents enjoyed their audio tours of the two exhibits.

Settlement Centre

Settlement Centre in Borgarnes

Borgarnes

View of Borgarfjörður from Borgarnes

We drove straight through to Reykjavik after our educational stop in Borgarnes, and made it back in time for dinner. The next morning after a thorough cleaning we said a fond farewell to the wheeled home that had taken us all the way around Iceland’s Ring Road in six days, and picked up a rental car for my parent’s last days in Iceland. The only parts of Iceland we’d been unable to visit during our Ring Road adventure were the West Fjords and the highlands that make up the center of Iceland, but we hadn’t done too poorly in the six days we’d rented the RV. Plus, even though we’d returned the RV we still had a couple days left to explore the Reykjavik area by car before my parents had to return to the U.S. and we had to return to our daily routines (see the next post on our Hveragerði day trip).

Hveragerði

Hveragerði Hot Pot

Sadly, my parent’s trip to Iceland did eventually come to an end, but before that fateful morning we decided to wrap up our travels around Iceland with the “Around Iceland” tasting menu at the Fish Company restaurant in downtown Reykjavik. Eating small, expertly-prepared portions of locally-sourced foods — Icelandic lobster (it’s not really lobster), fresh fish, many parts of a lamb, and carrot cake — from around Iceland was the perfect end to an amazing adventure. We spent a long time that evening sipping coffee from rainbow thermoses in that dark little restaurant under a bridge just talking about our trip and coming to terms with the fact that it was coming to a close. I can honestly say that if you ever want to spend a single week driving all the way around a country that you should come to Iceland. There is no better Ring Road.

Around Iceland Menu at the Fish Company

The Last Supper of Our Around Iceland Adventure

Road’s End

Posted in Travel Tips | Tagged , , , , , , , | Leave a comment

Iceland’s Ring Road: Day Five

Day Five (Mývatn and the North): Mývatn Nature BathsLake MývatnDimmuborgir, Skútustaðir Pseudocraters, GoðafossAkureyri

Mývatn Nature Baths

Mývatn Nature Baths — The Blue Lagoon of the North

What’s not to like about a lake-size hot tub nestled in Iceland’s rocky northern hills overlooking a verdant valley of green growth, volcanic craters and neon blue waters? You do have to watch out for cold spots, hot spots and some naturally occurring heat-loving algae, but the cool areas feel nice after trying to cook yourself in the deliciously hot zones and the algae is supposed to be good for your skin. So really? There’s nothing not to like about the Mývatn Nature Baths except the price, which at just under $30 is still $20 cheaper than the mother of all geothermal hot tubs — the Blue Lagoon — in Southern Iceland.

Mom at Mývatn Nature Baths

We Were The First People in the Baths That Morning

Our plan for day five of our trip around Iceland was to drive down the east coast of Lake Mývatn, around the southern tip of the lake, and then west down the Ring Road to Akureyri — the capital of the north. My family made a unanimous decision that the best way to start such a jam-packed day of touristy adventuring was with  a couple hours of soaking at the Mývatn Nature Baths. In the summer the baths open at 9am, and if there is anything that will get me up early it’s a lake of hot water.

Enjoying the Nature Baths

My Happy Place

We got to the baths right after they opened, put everything in sex-separated lockers, put our locker keys around wrists and ankles, and showered naked before putting on swimsuits in accordance with Iceland’s health and hygiene standards (there is no or very little chlorine in Icelandic community pools and hot pots, so nothing makes Icelanders angrier than dirty foreigners polluting their geothermal pools). The only time I ever heard Icelanders rant it was about the “kreppa” or crisis (the Icelandic banking meltdown), politics (the same the world over), foreigners not showering before swimming, and foreigners calling Icelandic horses ponies. Don’t anger your viking hosts! Shower thoroughly with soap before swimming, and remember to say “horse” even when you’re thinking “pony”. Coincidently, after spending two hours at the baths we visited a paddock of Icelandic horses during our search for a tiny, naturally-occurring geothermal pool hidden in a crevice just south of the village of Reykjahlíð.

Icelandic Horses

Icelandic Horses Are Not Ponies (No Matter What They May Look Like)

Hot Pot in the Rocks

We Found the Secret Toxic Pool

Unfortunately, our guidebook informed us that the small geothermal pool had become contaminated and was no longer safe for swimming, but it was still fun to find a heated turquoise hot tub in a tiny cave. Our next stop a few miles down the road from Reykjahlíð was Hverfjall Crater — a tuff ring volcano that last erupted thousands of years ago. We didn’t have time to take one of the hiking paths up to the crater rim, but stopped to photograph it from a gravel road.

Hverfjall Crater

Hverfjall Crater to East of Lake Mývatn

One of the highlights of our day was visiting the natural rock maze that is Dimmuborgir or “dark cities/castles” — a sprawling field of lava rock formations and caves explored via a couple miles of twisting trails. There were giant arches, collapsed lava tunnels, haphazardly balanced rocks, natural lava towers, and even a large cavern called the Kirkjan or “church”. The only thing better than walking and photographing the lava field was relaxing over cake and coffee at the cafe overlooking Dimmuborgir on one side and Lake Mývatn on the other after the hike. If you’d like to try a local specialty called hverabrauð — a dark molasses bread baked in a geothermal hot spot — you can buy a loaf at the Dimmuborgir cafe.

View of Lake Mývatn

Looking Down on Lake Mývatn from the Cafe

Dimmuborgir

Dimmuborgir — A Labyrinth of Lava Rock Formations

My Parents at Dimmuborgir

Mom and Dad in Dimmuborgir’s Lava Forest

Lava Cathedral at Dimmuborgir

Mom Visits the Lava Cathedral

After the lava field, we decided to pull over at a turn out overlooking the lake and some of the rock formations jutting out of the water. Fields of green grass and wildflowers led the way down to the shallow lake shore. Chris and I decided this would be a great place to test out our underwater camera for the first time.

Underwater at Lake Mývatn

Testing Our Underwater Camera in Mývatn

The day was more than half over and we had barely made it to the southern tip of Lake Mývatn with two of the most beautiful sites yet to come. On Lake Mývatn’s south shore we finally came to the pseudocraters that Mývatn is famous for — these giant craters were formed by explosions during ancient eruptions from lava fissures under the lake. The large collection of pseudocraters at Skútustaðir on the south shore is a national monument, and well worth a stop.

Skútustaðir Pseudocraters

Pseudocraters on Mývatn’s South Shore

There are trails and stairs around, up and into the Skútustaðir pseudocraters, which gracefully jut over the lake and summer fields of yellow flowers. Lake Mývatn is famous for it’s waterfowl and even has a museum dedicated to birds on the west shore. We were lucky enough to see several family groups of waterfowl swimming together amongst the pseudocraters.

Pseudocraters Close Up

Pseudocraters Formed by Explosions Over a Lava Fissure

After a short walk my parents left Chris and I to explore the craters to our heart’s content, while they had an afternoon nap and non-alcoholic beer (you can only buy alcoholic beverages in Iceland at special state-run liquor stores so grocery stores sell beer sans alcohol) on the RV kitchen table that transforms into a bed.

Party in the RV

Mom and Dad Relax RV-Style on the Dining Table

We were all getting tired at this point, so we made only one more stop on our way to Akureyri. What’s worth stopping for on a road trip when everyone is getting tired and just wants to get to the final destination? Ice cream of course! Ok, we actually stopped to see the awe-inspiring “Waterfall of the Gods” or Goðafoss — the Niagara Falls of Northern Iceland — but there was also ice cream at the little gas station store by the parking lot.

Goðafoss

Goðafoss — “Waterfall of the Gods”

Goðafoss got its name from an Icelandic legend that says when the head of the pagan church and Icelandic’s ancient parliament made the decision to switch the country to Christianity in order to avoid bloodshed over the two religions, he threw the idols of the Norse gods into this waterfall on his journey home. I personally think it must also be called the “Waterfall of the Gods” because it’s one of the most beautiful waterfalls in Iceland.

Goðafoss Across the River

Goðafoss from the Other Side

Ice cream and rainbows in the fine mist of Goðafoss’s turbulent waters made for the perfect end to day five of our trip around the Ring Road. It wasn’t long after Goðafoss that we reached our campground outside of Akureyri and settled down in a grassy glen on the slope of the peaks surrounding the fjord. It was a bittersweet end to an amazing day — bittersweet because we knew that day six would be our last day RV’ing around Iceland.

Goðafoss Rainbow

The Rainbow Ends Where the Gods Went In

Day’s End

Posted in Travel Tips | Tagged , , , , , , , , , | Leave a comment